Golf spikes play a vital role in providing stability and traction on the golf course. Over time, however, these spikes can wear down, reducing their effectiveness. When that happens, it’s essential to know how to remove and replace them to maintain optimal performance.
In this article, we will guide you through the process of removing golf spikes step by step, ensuring you can keep your golf shoes in top condition for a better game.
Introduction
Whether you’re a seasoned golfer or just starting to explore the sport, having the right equipment is crucial. Golf shoes with proper spikes are designed to provide stability and prevent slipping, allowing you to maintain balance during your swing and navigate various terrains with confidence. However, like any other piece of equipment, golf spikes require regular maintenance and replacement to ensure they continue to serve their purpose effectively.
Why are Golf Spikes Important?
Golf spikes are essential because they provide the necessary traction and stability needed during a golf swing. Without proper spikes, golfers can experience slippage, affecting their balance and potentially leading to suboptimal shots. Moreover, golf spikes help distribute body weight evenly, reducing the strain on specific areas of the foot and providing comfort throughout the round.

Types of Golf Spikes
Before diving into the process of removing golf spikes, it’s essential to understand the different types available:
Metal Spikes
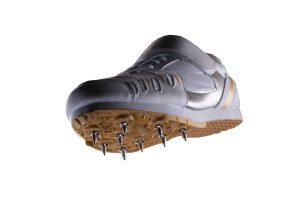
Metal spikes were commonly used in the past due to their excellent traction on various surfaces. However, most golf courses have now banned them due to their potential to damage greens. Metal spikes tend to wear down slower than plastic ones but require more maintenance to prevent rust and keep them sharp.

Plastic Spikes
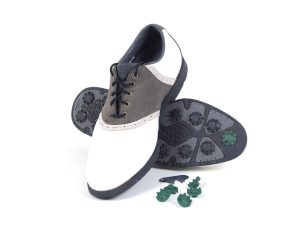
Plastic spikes have gained popularity as a safer and more course-friendly alternative to metal spikes. They provide excellent traction on the golf course while being gentle on the greens. Plastic spikes are easier to maintain and replace, making them a popular choice among golfers.

Spikeless Shoes
Spikeless shoes have become increasingly popular in recent years. They feature a sole with numerous small nubs or dimples instead of traditional spikes. While they may not offer the same level of traction as spiked shoes, spikeless options provide versatility and can be worn comfortably on and off the golf course.

Signs it’s Time to Replace Golf Spikes
Knowing when to replace your golf spikes is essential for maintaining optimal performance on the golf course. Here are some signs that indicate it’s time to replace your golf spikes:
Worn-down spikes
Inspect the spikes on your golf shoes regularly. If you notice significant wear and tear, such as spikes that have become flat or dull, it’s a clear sign that they need replacement. Worn-down spikes can lead to reduced traction and stability, negatively impacting your swing and overall game.
Reduced traction
One of the main purposes of golf spikes is to provide traction, especially on wet or slippery surfaces. If you find yourself slipping or losing your footing during your swing, it’s a strong indication that your spikes are no longer providing the necessary grip. This is a clear sign that it’s time to remove and replace them.
Uncomfortable shoes
Golf spikes that have become worn or damaged can cause discomfort during your round. If you start experiencing discomfort or pain in your feet, it could be a result of spikes that are no longer supporting your feet properly. Replacing them can significantly improve your comfort and prevent potential foot-related issues.
Tools Needed for Removing Golf Spikes
Before you begin the process of removing golf spikes, it’s important to gather the necessary tools. Here are the tools you’ll need:

Golf Spike Wrench
A golf spike wrench is a specialized tool designed to remove and tighten golf spikes. It typically has a handle with a socket that fits over the spike receptacle, allowing you to rotate and loosen the spikes easily.
Needle-Nose Pliers
In some cases, golf spikes may be stubborn or damaged, making them challenging to remove with a wrench alone. Needle-nose pliers can be helpful in such situations. They allow you to grip and twist the spike for easier removal.
Replacement Spikes
Before removing your old spikes, make sure you have replacement spikes on hand. You can purchase them at golf specialty stores or online. It’s important to choose spikes that are compatible with your golf shoe model to ensure a proper fit.
Step-by-Step Guide to Removing Golf Spikes
Now that you have your tools ready, let’s walk through the process of removing golf spikes:

Clean the Shoe Surface
Start by cleaning the surface of your golf shoes to remove any dirt or debris that may interfere with the spike removal process. Use a brush or cloth to wipe away any particles.
Locate the Locking Mechanism
Examine the sole of your golf shoe to locate the locking mechanism for the spikes. This is usually a small receptacle or socket where the spikes are attached.
Insert the Golf Spike Wrench
Insert the golf spike wrench into the receptacle, making sure it fits securely. The wrench should have a socket that matches the size of the receptacle.
Rotate Counterclockwise to Loosen
Apply gentle pressure and rotate the wrench counterclockwise to loosen the spike. Be careful not to apply excessive force, as this can damage the spike or the receptacle.
Remove the Old Spike
Once the spike is loosened, carefully lift it out of the receptacle using the wrench or needle-nose pliers, if necessary. Place the old spike aside and repeat the process for the remaining spikes.
Repeat for All Spikes
Continue the process of loosening and removing all the spikes from your golf shoes until they are all removed. Take your time and be mindful of any stubborn or damaged spikes that may require extra effort to remove.
How to Install New Golf Spikes
After removing the old spikes from your golf shoes, it’s time to install the new ones. Follow these steps to ensure a proper installation:

Prepare the New Spikes
Inspect the replacement spikes to ensure they are in good condition and match the type and size of your original spikes. Clean them if necessary to remove any dirt or debris.
Align the Spike with the Receptacle
Align the new spike with the empty receptacle on your golf shoe. Ensure that the threads of the spike align with those in the receptacle for a secure fit.
Insert the Spike
With the spike aligned, gently push it into the receptacle, applying slight pressure. Make sure the spike goes in straight to avoid cross-threading or damaging the receptacle.
Twist Clockwise to Secure
Once the spike is inserted, use your fingers or the golf spike wrench to twist it clockwise. Rotate until the spike feels snug and securely fastened. Be cautious not to overtighten, as it may cause damage.
Repeat for All Spikes
Repeat the process of aligning, inserting, and securing the remaining spikes. Take your time to ensure each spike is properly installed and tightened.
Maintenance Tips for Golf Spikes
To extend the lifespan of your golf spikes and keep them in optimal condition, consider the following maintenance tips:

Clean After Each Round
After every round of golf, take the time to clean your golf shoes, paying special attention to the spikes. Remove any dirt, grass, or debris that may have accumulated. This prevents buildup and maintains traction.
Inspect Regularly
Regularly inspect your golf spikes for signs of wear, damage, or looseness. Look for any spikes that may be missing, bent, or no longer providing adequate traction. Promptly replace any damaged or worn-out spikes to maintain performance.
Replace When Necessary
As a general guideline, it’s recommended to replace your golf spikes every 15-20 rounds or at least once a season. However, this may vary depending on your playing frequency and the condition of the spikes. If you notice significant wear or reduced traction, replace the spikes sooner.
Conclusion
Proper maintenance of your golf spikes is essential for ensuring optimal performance on the golf course. By knowing when and how to remove and replace your golf spikes, you can maintain stability, traction, and comfort during your game. Remember to regularly inspect your spikes, clean them after each round, and replace them when necessary. By following these guidelines, you’ll be well-equipped to keep your golf shoes in excellent condition and enjoy a better golfing experience.( free golf giveaways )
FAQs
How often should I replace my golf spikes?
It’s generally recommended to replace golf spikes every 15-20 rounds or at least once a season. However, monitor their condition and replace them sooner if significant wear or reduced traction is evident.
Can I remove golf spikes without a golf spike wrench?
While a golf spike wrench is the ideal tool for the job, you can use needle-nose pliers as an alternative if necessary. Just be cautious to avoid damaging the receptacle.
Are metal spikes still allowed on golf courses?
Most golf courses have banned metal spikes due to their potential to damage greens. It’s best to check with the specific golf course you plan to play at to ensure compliance.
Are spikeless golf shoes as effective as spiked shoes?
Spikeless golf shoes provide versatility and comfort, but they may not offer the same level of traction as spiked shoes. They are a popular choice for casual golf players and those who prefer a more versatile shoe for on and off the course use.
Can I replace my golf spikes with a different type?
Yes, you can replace your golf spikes with a different type, such as switching from metal to plastic spikes. However, make sure the new spikes are compatible with your golf shoe model to ensure a proper fit.
Do I need any special skills to remove and replace golf spikes?
Removing and replacing golf spikes does not require any special skills. With the right tools and following the step-by-step guide, anyone can easily remove and replace their golf spikes.


